Welcome to another tutorial (with video too). Today, we’re going to talk about beats, bars, beat-grids and beat-grid editing, BPM and everything rhythm related.
First, we will need just a bit of basic music theory for DJs. As you know, all music is made up of beats. When you say a song is at 120 BPM what this literally means that there are exactly 120 beats in a minute. So, this is a beat.
A bar, also known as a measure, is made up of 4 consecutive beats. Or at least this is the case with 99% of all the commercial music available which is 4 by 4 (4:4). This means 4 beats per bar and each beat represents a quarter note. But we’re getting a bit too technical here, let’s get back to future.dj pro.
Automatic bar detection and down-beat detection
The good news is that we now have automatic bar detection and down-beat detection in future.dj pro. What’s a down-beat you ask? Well, it’s the very first beat in each bar, it marks the starting of a bar – visually, it is slightly thicker than a regular beat.
The first down-beat (as is marked automatically by future.dj pro or by the user) is numbered 1.1. The first number is the bar number and the second number is the beat number (Bar.Beat). Visually, this specially chosen down-beat is red.
A beat-grid is basically made out of all the bars and beats of the song that you can experience in a visual way as a grid.
It’s better to just show you all these in a video:
As you know, future.dj pro automatically detects the beat-grid but sometimes it might get it sligthly wrong or even completely wrong for certain tracks.
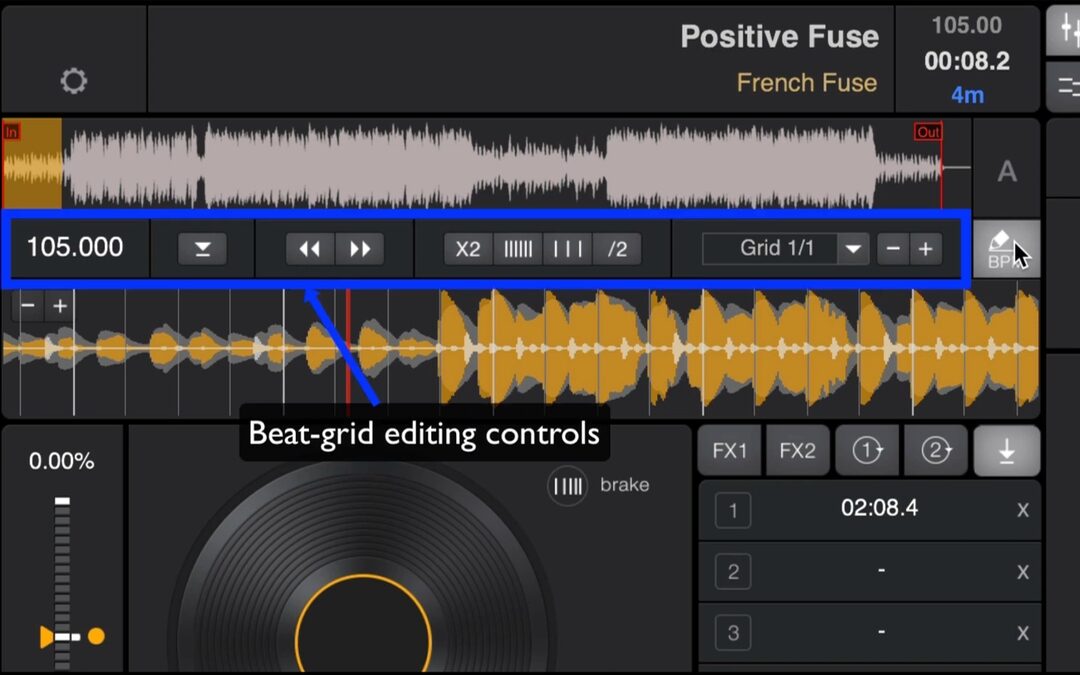
So, what can we do if this happens? Well, until recently you couldn’t do much about it, just hope for the best that the automatic detection worked. Now, all this has changed. Let’s take a look at the newly added beat-grid editing. This is a very powerful new feature that will allow you to properly set the beat-grid and BPM of tracks.
This will allow you to much better use Sync when mixing tracks.
How to do this
Again, it’s much better to see this in action in the video above. But, just for reference, the steps to correct the beat-grid of a track are like so:
- Choose the first down-beat in the track – this will usually be the first energy-intensive beat (eg. the first drum kick). To do so, you need to move / drag the waveform to the play position and hit the Set DownBeat button.
- Move / slip the beat-grid left or right until the down-beat marking is perfectly aligned with the actual beat in the waveform. We won’t need to touch this again.
- Adjust the beat size until the next beats align correctly with the beats from the waveform. You will notice that while you adjust the beat size the BPM value also changes.
- Repeat the step above (step 3) for as many times as needed to have a correct alignment throughout the whole song. Start by scrolling a bit past where the initial down-beat was. Then scroll a bit more (maybe 20-30 seconds at a time) and re-adjust the beat size. Go all the way to the end of the track and correct the beat size along the way.
So, there you have it, this is how beat-grid editing works for a track. For songs that have a dynamic tempo (eg. live-playing bands) or different parts / sections that have a different BPM / beat-grid, you can add as many beat-grids as you’d like.
This new feature will be available in the very next future.dj pro 2.1 release which is coming very soon, this was just a sneak peak.
Later edit: version 2.1 is now available for both Windows and Mac users!
Stay tuned and stay creative!